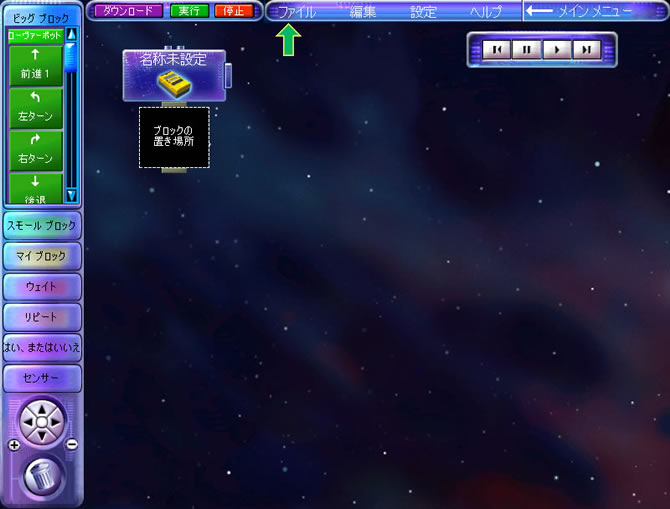
次の画面はMindStormsのプログラミング環境、Robotics Invention System2.0です。
ここにプログラムブロックを置きプログラミングをしていきます。
ここで注目すべきはビックブロックです。このビックブロックにはロボットの種類に応じて異なったメソッド(アクション)が設定されています。
ロボットの種類を選択することができます。

フリースタイルプログラミングではさまざまなロボットに応じたビッグブロックを選ぶことができます。
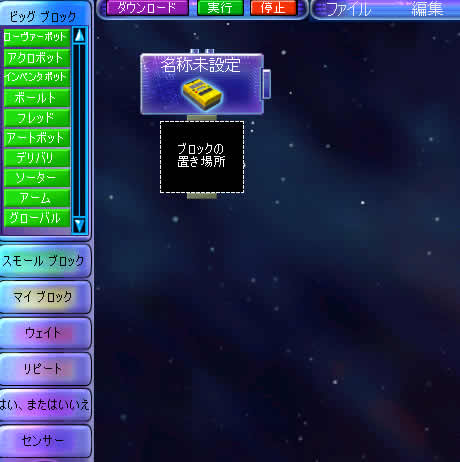
アクロボットのビッグブロックが表示されています。この中から「前進1」をドラッグ&ドロップしてみましょう。
「前進1」はアクロボット、ローヴァボット、アートボットのビッグブロックに共通にあります。
大概のビッグブロックはロボットの種類ごとにやや中身が違っています。
では、このビッグブロックはどのような命令の集まりになっているのでしょうか。
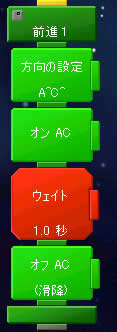
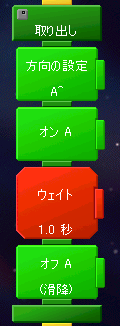
左上のグレーのボタンをクリックするとビッグブロックを展開することができます。
次の図は「前進1」の内容とよく似たメソッドの展開図です。これらはすべて
「方向の設定(パラメータ)」→「オン(パラメータ)」→「ウェイト(パラメータ)」→「オフ(パラメータ)」という構成になっています。
| 前進1 | 前進2 | アームを上げる | ドアを開く | 取り出し |
|---|---|---|---|---|
 |
 |
 |
 |
 |
ローヴァーボット |
デリバリ | アーム | ボールド | ソーター |
これをJava風に書いてみるとこんな感じになるのでしょうか。
import java.Robo.*;
abstract public class Robotics{
public Robotics(String method int time){
this.method = method;
this.time = time;
}
public void action(){
方向の設定(getMorter1(),getMorter2(),getDir());
オン(getMorter1(),getMorter2());
ウェイト(getTime());
オフ(getMorter1(),getMorter2());
System.out.print(method);
}
private String method;
private int time;
protected abstract String getMorter1();
protected abstract String getMorter2();
protected abstract String getDir();
}
public class RoverBot extends Robotics{
public RoverBot(String method,int time){
super(method,time);
}
protected String getMorter1(){
return "A";
}
protected String getMorter2(){
return "B";
}
protected String getDir(){
return "~";
}
}
public class ArtBot extends Robotics{
public ArtBot(String method,int time){
super(method,time);
}
protected String getMorter1(){
return "A";
}
protected String getMorter2(){
return "B";
}
protected String getDir(){
return "~";
}
}
public class AcroBot extends Robotics{
public AcroBot(String method,int time){
super(method,time);
}
protected String getMorter1(){
return "A";
}
protected String getMorter2(){
return "B";
}
protected String getDir(){
return "~";
}
}
public class Delivery extends Robotics{
public Delivery(String method,int time){
super(method,time);
}
protected String getMorter1(){
return "C";
}
protected String getMorter2(){
return "";
}
protected String getDir(){
return "v";
}
}
public class Arms extends Robotics{
public Arms(String method int time){
super(method,time);
}
protected String getMorter1(){
return "C";
}
protected String getMorter2(){
return "";
}
protected String getDir(){
return "v";
}
}
public class Bold extends Robotics{
public Bold(String method int time){
super(method,time);
}
protected String getMorter1(){
return "A";
}
protected String getMorter2(){
return "";
}
protected String getDir(){
return "v";
}
}
public class Sorter extends Robotics{
public Sorter(String method int time){
super(method,time);
}
protected String getMorter1(){
return "A";
}
protected String getMorter2(){
return "";
}
protected String getDir(){
return "~";
}
}
public class ProBlock {
public static void main(String[] args){
Robotics robo = null;
if(args[0].equals("RoverBor"){
robo = new RoverBot(args[1],Integer.parseInt(args[2]);
}
if(args[0].equals("AcroBot"){
robo = new AcroBot(args[1],Integer.parseInt(args[2]);
}
if(args[0].equals("ArtBot"){
robo = new ArtBot(args[1],Integer.parseInt(args[2]);
}
if(args[0].equals("Delivery"){
robo = new Delivery(args[1],Integer.parseInt(args[2]);
}
if(args[0].equals("Bold"){
robo = new Bold(args[1],Integer.parseInt(args[2]);
}
if(args[0].equals("Sorter"){
robo = new Sorter(args[1],Integer.parseInt(args[2]);
}
robo.action();
}
}
実行
c:\java ProBlock RoverBot 前進1 5
#このコードはイメージです。
これはTemplate Method パターンを使いました。
しかし、JavaのコードよりMindStormsのコードの方がはるかにわかりやすいですね。
そしてオブジェクト指向に関連づけるのもやりやすいような気がします。
1、
ロボットの形を決める→オブジェクトの生成
2、メソッドを呼び出す→継承、ポリモーフィズム
最後にサンプルプログラムを表示します。
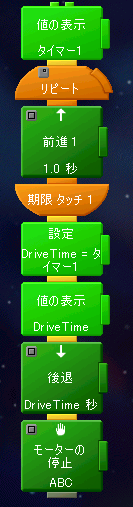
これはタイマーを設定し、タッチするまで前進1をした後、同じ時間だけ後退するものです。
非常に直感的で理解しやすいと思います。